
Welcome, [wlm_firstname]
First Things First
If you haven’t set up your free chatbot account yet, please go here to complete your account setup request form.
This chatbot training section covers the following areas:
- Building Chatbots – Tutorials
- How To Grow Recurring Income Selling Chatbots
- Chatbot Templates
- Chatbot Resources
- Chatbot Specs & FAQs
Building Chatbots – Tutorials
Click on the tutorials below to learn how to build, deploy, and troubleshoot chatbots for clients.
Getting Started
- Full Walkthrough – This walkthrough covers all the essentials.
- Removing ‘Powered By’ Branding – Sell your chatbots under your brand.
- AI Mode Walkthroughs – Understand how AI Mode & Hybrid Mode function in real-world scenarios.
- How to install a chatbot – A simple guide to deploying your bot on different platforms.
- How to demonstrate bots for clients – Showcasing your chatbots to potential clients.
- Can I grant clients access to edit their bot? – What clients can (and can’t) edit in their chatbot accounts.
- Building your first bot – A step-by-step guide to building your first chatbot from scratch.
Integrations
- Google Sheet Integration – Automate workflows with Google Sheets.
- Zapier Integration – Connect your chatbot to thousands of apps via Zapier.
- Make (Make.com) Integration – Learn how to set up powerful automation with Make.
Troubleshooting
- My bot is not appearing – Quick fixes for bots that won’t display.
- AI not responding – Common AI issues and how to resolve them.
- Styling issues (hidden text, wrong colors, etc.) – How to fix visual glitches.
- Shopify Widget Issues – Solutions for Shopify-related chatbot problems.
- AI responses too long – Adjust AI message length for better user experience.
- Missing data in Integrations – Troubleshoot data sync issues with integrations.
- General flow builder issues – Fix common problems when designing chatbot flows.
How To Grow Recurring Income Selling Chatbots
Please download the guide from the Chatbot Resources page.
Client Demo Bot
You can showcase the demo chatbot below to prospective clients.
This chatbot is available as a template (My Bots > Create From Gallery).

Chatbot Templates
You can easily access new chatbot templates from your dashboard. Here’s how:
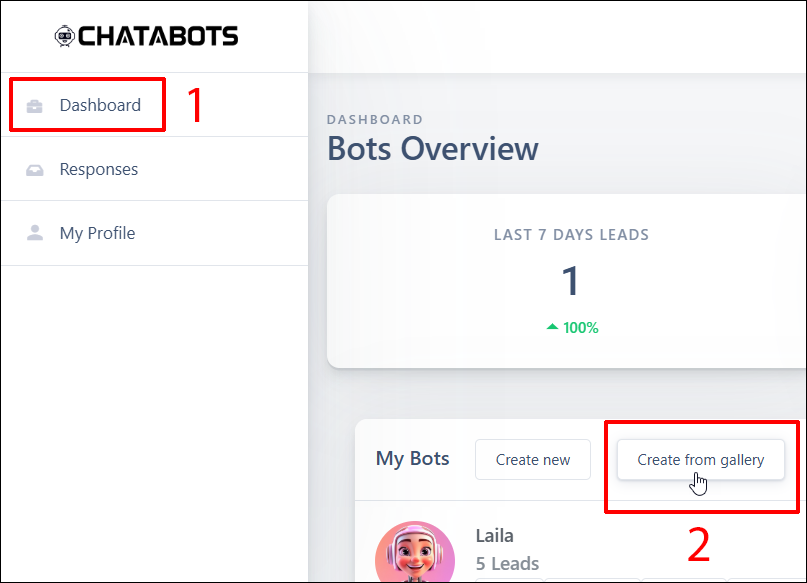
Log into your chatbot account, then go to your Dashboard and click on Create from gallery...
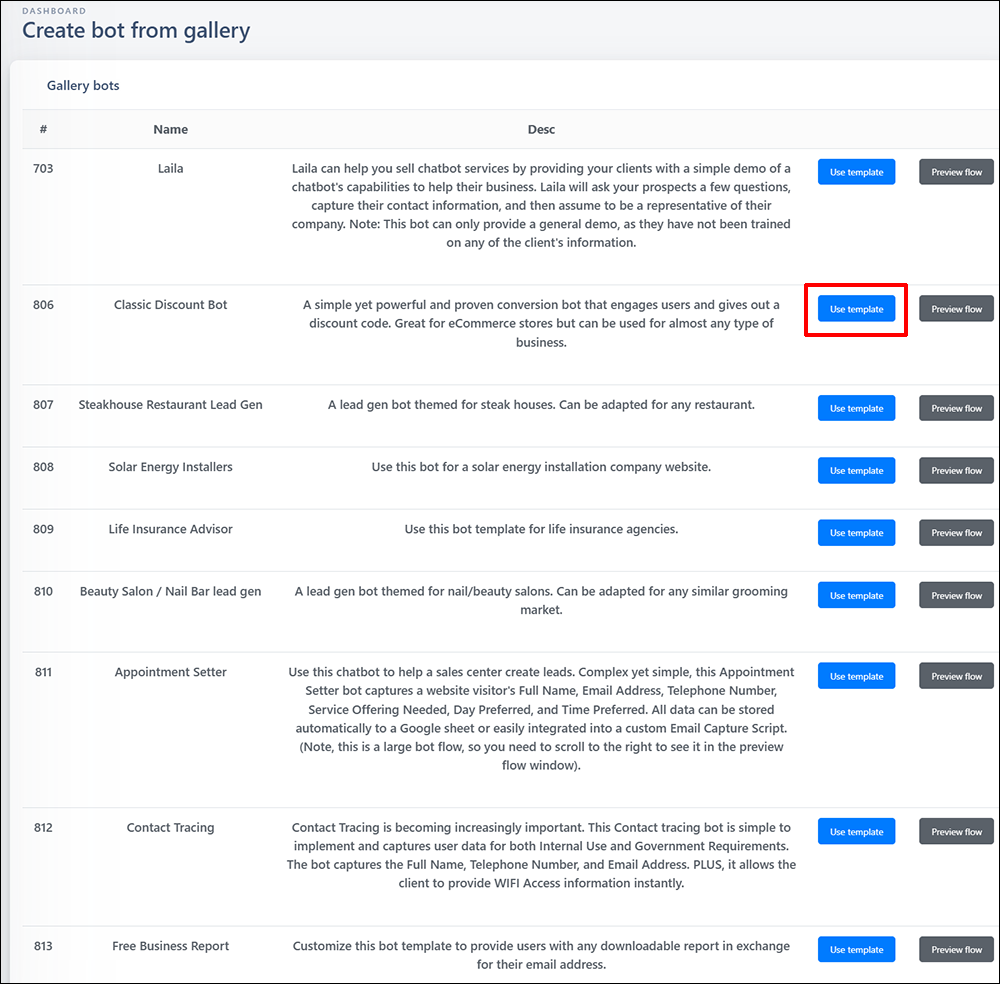
Select a template from the chatbot gallery and click the Use template button to load the bot template to your account, or click Preview Flow to preview it before importing.
Note: You can import multiple templates into your account by clicking the “Use template” button. This will automatically load the template into your account.
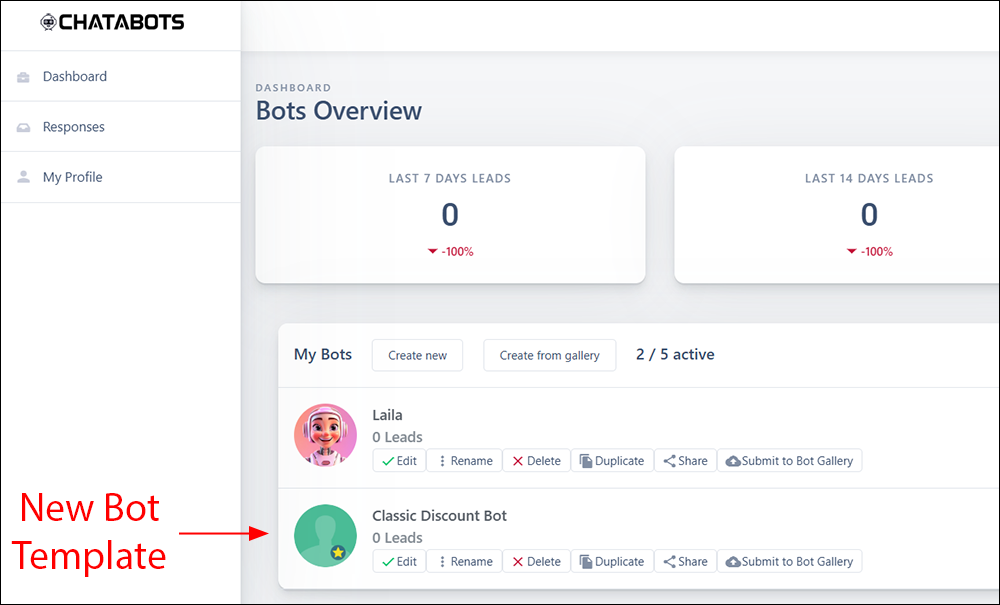
When you’re done adding bot templates, click Dashboard on the menu to return to the Dashboard > Bots Overview screen.
Your new bot template will be loaded and ready to be customized.
Chatbot Resources
Get time-saving guides and resources for building and growing your chatbot services here: Chatbot Resources
Chatbot Specs and FAQs
This section contains additional specifications about the chatbots and member FAQs
CHATBOT BUILDING BLOCKS
You can build chatbots using the following blocks:
- Message Block – Add a standard message (e.g., add a welcome message with a prompt like “How may I help you”?)
- Question Block – Ask the user a question
- Email Block – Ask the user for email address
- Multi-Choice Block – Add multiple choices (e.g., please select Option A, Option B, or Option C)
- New Option Block – Add a multiple Choice Option to Multi-Choice Block
- AI Mode Block – Activates AI mode (integrates ChatGPT and can train on up to 65,000 characters, including URLs and PDF documents)
- Image Block – Add an image or gif to chatbot conversation
- Video Block – Add video and sound to chatbot conversation
- Loop Block – Send the user to any block in the existing chatbot workflow
- Redirect Block – Redirect the user to a specified link (e.g., web page or booking calendar)
- Save Data Block – Saves user input (useful for integration with CRMs, etc.)
CHATBOT WIDGET SETTINGS
These settings are required to create a chatbot widget:
- Position: Bottom Right, Bottom Left
- Widget title
- Welcome message
- Call to action message: Message next to the chat icon
- Show call to action message
- Appear on: All pages, Specific Pages
- Fallback message: Message to display when the dialog is over, but the user continues to communicate
- Avatar image
- Theme: Hex color for chatbot widget theme
BOT EDITOR SETTINGS FIELDS
The following information will help you configure the chatbot settings:
- Initial Status: Enabled, Disabled
- Google App Script URL
- Google Sheet ID
- Email for notifications
- Zapier Webhook URL
- Make Webhook URL
- Domain whitelist (comma-separated): e.g. site.com, site2.com
- Responses: Save responses, Do not save responses
- Conversation Cache Time (minutes)
- Branding: Show/Hide branding
- Notification Badge: Show/Hide notification badge
- Notification sound: on/off
- Mailchimp API key
- Klaviyo API key
- Internationalization
- Write a reply: You can change the default ‘Write a reply’ widget text to a different language by specifying a replacement.
- Select answer: You can change the default ‘Select answer’ widget text to a different language by specifying a replacement.
- That doesn’t look like a valid email. Please enter a valid email.: You can change the default ‘That doesn’t look like a valid email. Please enter a valid email.’ validation message to a different language by specifying a replacement.
- Please only enter numbers.: You can change the default ‘Please only enter numbers.’ validation message to a different language by specifying a replacement.
CHATBOT & AI Integration
The chatbots integrate with OpenAI’s ChatGPT. Additional AI providers (like Google Gemini, Claude, etc.) will be added shortly.
We provide 100,000 OpenAI tokens at no cost to get you started. After this, simply enter your own OpenAI key to continue.
Enter your OpenAI key in the Edit Profile screen.
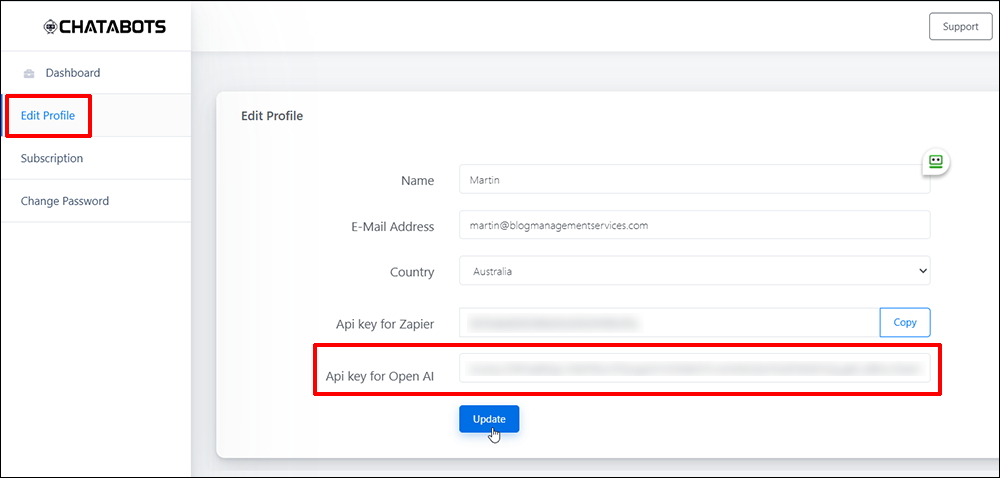
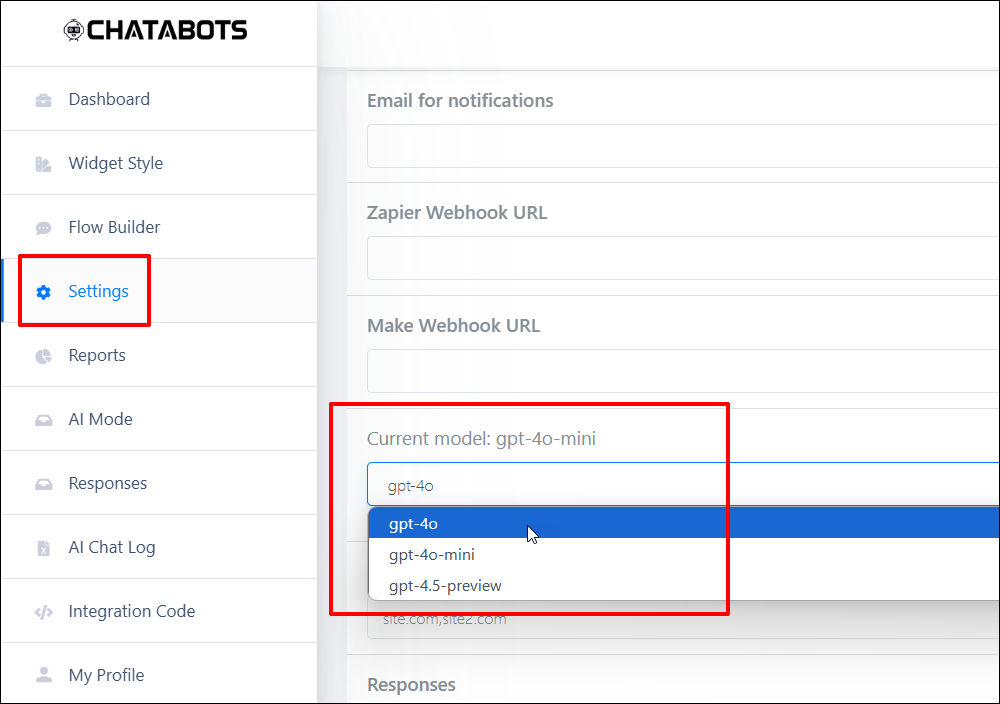
Note: Entering your OpenAI key allows you to select a GPT model on a bot-by-bot basis. After entering your OpenAI key, select a chatbot, navigate to the Settings menu, and select a model from the Current model dropdown.
CHATBOT INTEGRATION
- Chatbots can be displayed on websites as widgets or inline (e.g., inside the content of a web page)
- Inline Embeddable Bot Configurations:
- Desktop View Configurations: You can set width and height values in pixels (e.g., 50px) or percentages (e.g., 50%)
- Mobile View Configurations: You can set width and height values in pixels (e.g., 50px) or percentages (e.g., 50%)
- Image Size Configurations: You can set values in pixels (e.g., 50px) or percentages (e.g., 50%)
FAQs
🔹 Can I see an example chatbot?
Yep! We use the exact same tech for the chatbot that offers a discount on the WordPress Toolkit on our home page.
🔹 What if I need more than 5 chatbots?
We offer affordable upgrade plans to help you scale your business. Contact us when you are ready to upgrade.
🔹 What types of sites are the chatbots best suited for?
While powerful and complex chatbots with conditional branching options, multimedia, link redirects, and AI integration can be easily built, they are ideal for typical small business websites.
🔹 Are There Any Limitations?
Currently, the chatbots:
- Are for website integration only (i.e., not for social media use like Facebook Messenger bots).
- Can be displayed on sites in compact form on all of your client’s website pages on specific pages or as an inline widget inside a page or post.
- Are ideally suited for small-to-medium businesses to generate leads and handle customer service inquiries. You can train them using your clients’ website URL or by uploading PDF files (a maximum of 500,000 characters of text).
- Are not suitable for enterprise-level or complex requirements or sites with an excessive number of pages, such as a large eCommerce site with thousands of products.
- Note: While the bots can easily handle complex requirements like conditional branching and integration with AI LLMs (Large Language Models), they are best positioned as an affordable option for businesses looking to integrate AI-powered automation into their websites.
🔹 How Do I Add Chatbots To WordPress?
You can add chatbots to any website platform. When you create a chatbot, navigate to the settings section, copy the code provided, and add it to WordPress using a code insertion plugin (e.g., WP Code).
See the tutorials section above for more details on how to do this.
🔹 I’m Using Another Chatbot Platform, Can I Migrate My Chatbots Over To Your Platform?
- Currently, there is no way to migrate chatbots across different platforms. Chatbots must be manually recreated inside your account.
- We give you 5 free chatbots, so you can test and get familiar with our platform.
- If you are currently paying for chatbots on another platform, you can save money by recreating at least 5 in your free account.
- If you need additional chatbots, please contact us to discuss your options.